◆ Latest: Version 5.0, 5.0 Codes, Natlan Quests
◆ Builds: Kinich, Raiden, Mualani, Kachina, Kazuha
◆ Natlan: Pyroculus, Saurian Claw Succulent
◆ Events: Dodoco, McDonald's Collab, 5-Star Selector
◆ Future: Version 5.1, Xilonen

Broken, Graffiti-Marked Stone is a hidden item in Natlan that you can use to unlock the Teticpac Peak's secret area in Genshin Impact 5.0. See all Broken, Graffiti-Marked Stone locations and how to use them all in this guide!
List of Contents
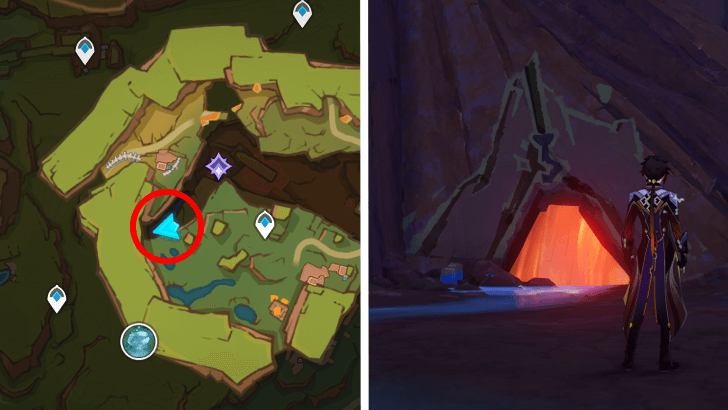
Teleport to the Sulfurous Veins waypoint near a Shrine of Depths and glide down to reach the marked location at the Rift in the Mountains layer. There, you'll find some graffiti around a cave entrance that's blocked by a glowing light.
Indwell the nearby Tepetlisaurus and go to the glowing floor pattern in front of the graffiti to activate the resonant rocks. You'll need to light up the six cubes in the area.
After doing so, the cave opens up and you can find a Precious Chest inside that has a Broken, Graffiti-Marked Stone!
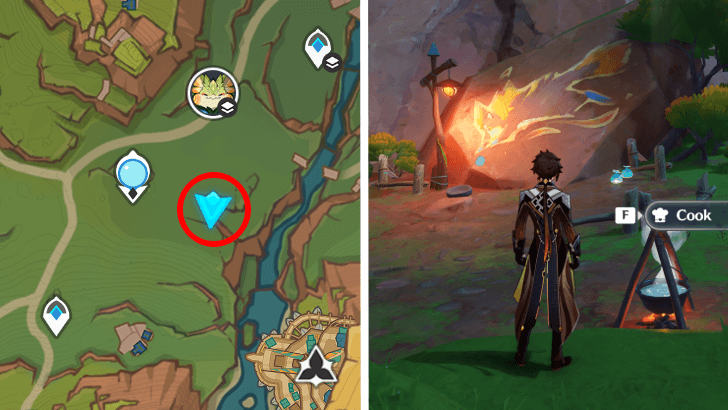
Teleport to the Statue of The Seven west of the Stadium of the Sacred Flame and head east towards the marked location. There'll be a rock with some graffiti on it near a campfire pot.
The graffiti shows a Flying Squirrel with what appears to be a blue fruit. Interact with the bowl in front of it to place a Quenepa Berry in it. There'll also be a few of them nearby if you don't have any onhand!
A chest will spawn after a Flying Squirrel comes to eat the berry. This gives you the next Broken, Graffiti Marked Stone!
Quenepa Berry Locations and How to Get

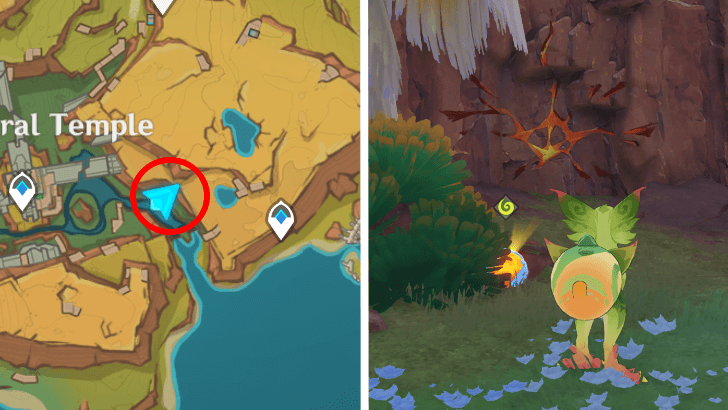
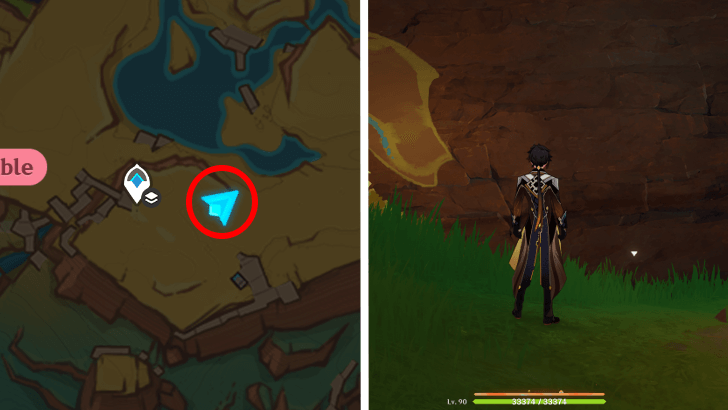
Head over to the cliff near the northwestern waypoint at the Ancestral Temple. The area will have a kamera pointed at some rock formations with graffiti on them.
Depending on your exploration progress, there may also be a locked chest guarded by an enemy. Defeat them first to proceed.
This stone entails a shooting challenge, so you'll need to have a bow character in your team. Once you're ready, interact with the kamera to spawn Anemo slimes! You'll need to shoot them when they float over the graffiti targets.
To get them all in one go, it's best to shoot at the slimes starting from the topmost target. After the challenge, you'll get a chest with another Broken Graffiti-Marked Stone.
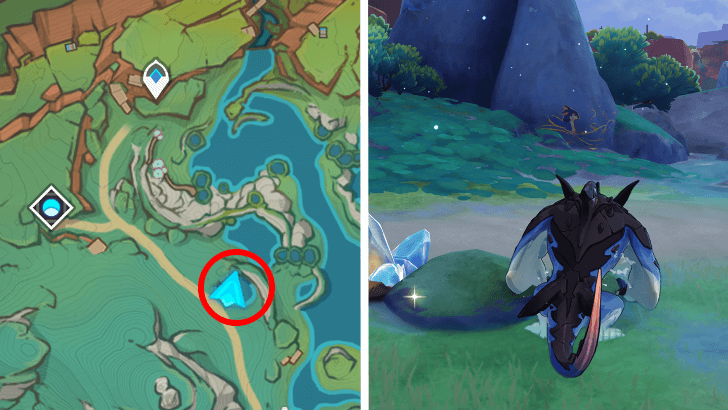
Teleport to the Ancestral Temple waypoint and glide southeast until you see a small stream leading to a waterfall. Follow the stream until the end and on the left side, you'll see a marked spot on the wall.
Use the Spiritsconce nearby to indwell into a Yumkasaurus and use its ability on a Flamegranate nearby to throw it at the wall. The wall will collapse and show you a Common Chest that contains the Graffiti-Marked stone.
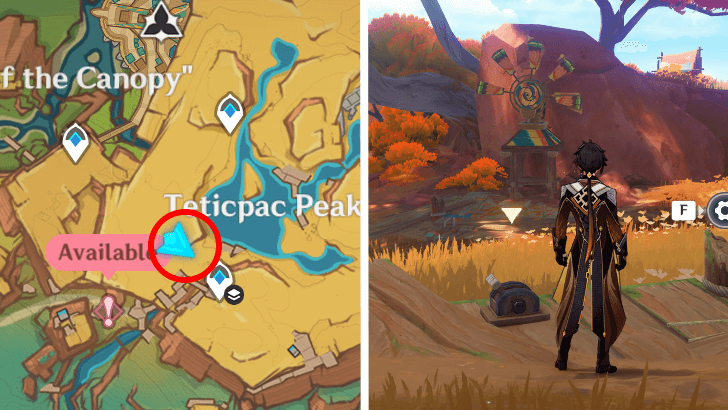
Use the north Teleport Waypoint in Teticpac Peak and head south until you see a small lever near some wooden crates. In front of it, a small windmill can be seen.
Use the small lever and it will make the windmill spin. If you activate it again, the windmill will stop. Time your activation and align the windmill with the marking on the wall to make a Common Chest that contains the Graffiti-Marked stone appear.
Use the north Teleport Waypoint in People of the Springs and head north until you see a small basin of water. One of the stones has a strange marking on it.
First, break the Condessence Crystal in the middle of the basin so that bubbles appear. You can then indwell a Koholasaur and go to each of the bubbles that appear to touch them, making the water level rise.
Once the water level rises, the marking on the stone will glow and make the Common Chest that contains the Graffiti-Marked stone appear.
Teleport to the waypoint inside the Amidst the Stony Mountains layer of Teticpac Peak and glide down to the area east of it. Here, you'll be able to submit the Broken, Graffiti-Marked Stones to finish the large wall graffiti!
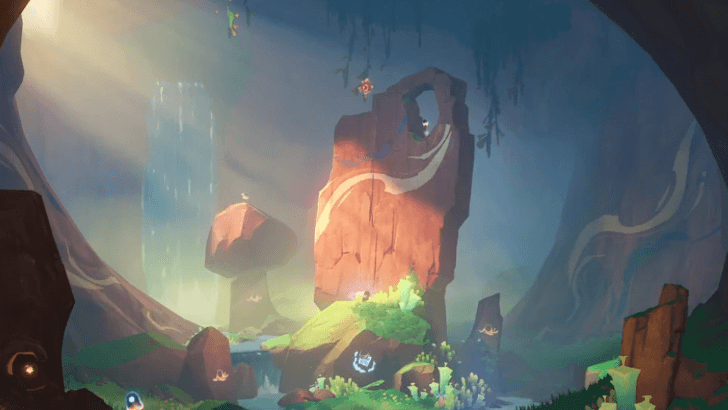
Once you've submitted all six Broken, Graffiti-Marked Stones, the wall disappear to reveal a hidden cave with a Pyroculus and a few other collectibles!


Broken, Graffiti-Marked Stone Locations and How to Use
Genshin Impact Walkthrough & Guides Wiki

Zenless Zone Zero Walkthrough & Guides Wiki

Honkai: Star Rail Walkthrough & Guides Wiki

Black Myth: Wukong Walkthrough & Guides Wiki

Pokemon Scarlet and Violet (SV) Walkthrough & Guides Wiki

Monster Hunter Rise: Sunbreak Walkthrough & Guides Wiki

Star Wars Outlaws Walkthrough & Guides Wiki

Wuthering Waves Walkthrough & Guides Wiki

Once Human Walkthrough & Guides Wiki

Palworld Walkthrough & Guides Wiki

Elden Ring Shadow of the Erdtree Walkthrough & Guides Wiki

Hyrule Warriors: Age of Calamity Walkthrough & Guides Wiki

The Legend of Zelda: Breath of the Wild Walkthrough & Guides Wiki

Super Smash Bros. Ultimate Walkthrough & Guides Wiki

FF7 Remake Walkthrough & Guides Wiki

Pokemon Legends: Arceus Walkthrough & Guides Wiki

New Pokemon Snap Walkthrough & Guides Wiki
Copyright© 2012-2024 HoYoverse — COGNOSPHERE. All Rights Reserved.
The copyrights of videos of games used in our content and other intellectual property rights belong to the provider of the game.
The contents we provide on this site were created personally by members of the Game8 editorial department.
We refuse the right to reuse or repost content taken without our permission such as data or images to other sites.


in the one with bubbles, i think you should hit the painting with a koholasaur! it worked for me