◆ Latest: Version 5.0, 5.0 Codes, Natlan Quests
◆ Builds: Kinich, Raiden, Mualani, Kachina, Kazuha
◆ Natlan: Pyroculus, Saurian Claw Succulent
◆ Events: Dodoco, McDonald's Collab, 5-Star Selector
◆ Future: Version 5.1, Xilonen
Swirl is an elemental reaction in Genshin Impact that occurs when Anemo meets Pyro, Hydro, Electro, or Cryo. Learn how to use Swirl, the best characters, and the best teams for it in this guide!
List of Contents
Swirl is the elemental reaction result that happens when Anemo reacts to Pyro, Hydro, Electro, and/or Cryo. It is a gateway reaction that not only does damage on its own, but sets the enemies up for other reactions.
This results in a tempest of elemental reactions swirling for high damage, especially when paired with Viridescent Venerer, Swirl's Best-in-Slot Artifact Set.

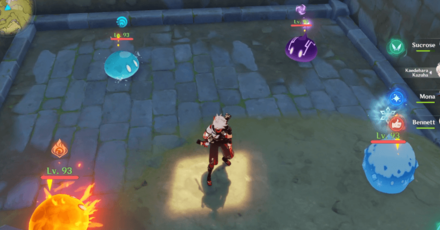
To trigger Swirl, the target must at least be afflicted with any or more of the above elements. This also applies to elemental beings such as slimes and hypostases.
However, it is worth noting that if the enemy is an elemental being, they are likely immune, or are highly resistant to their own element.

When Anemo comes into contact with the afflicted enemy, it will deal two instances of damage to them, with one being raw anemo damage, and the other being the swirled element.
In these cases, the raw anemo damage scales with the Anemo Character's ATK and CRIT stats, but the swirled element's damage is based off the Anemo Character's Level and Elemental Mastery.

To maximize the use of Swirl, players are advised to stack as much Elemental Mastery as possible, in addition to leveling their Anemo Characters to Level 90.
Something to note is that the potency of buffs applied by some Anemo Characters actually scale off of Elemental Mastery too, so having a lot can increase the buff's effectiveness.

If more than two elements are present at the time of casting, those two elements will Double Swirl, causing their respective reaction and creating a third instance of damage.
Since the Anemo Character is the one producing these reactions, the damage also scales from their Elemental Mastery. This Double Swirl mechanic is part of the reason why Swirl itself is so versatile.
Some Anemo Characters are able to infuse their abilities with the absorbed reaction, which is what causes the second, and sometimes continuous instance of Swirl damage.
It is worth noting that there is a priority of which elements will be infused. The higher they are on the priority list, the more they will overtake the other reactions.
| Elemental Infusion Priority |
|---|
All Anemo units have the capacity to be Swirl units if geared with the 4-piece Viridescent Venerer set, but some characters are better suited for the role than others.
Kaedehara Kazuha is the premier Anemo support for many reasons, with an amazing skillset that deals respectable damage and buffs that are among one of the best in the game.
Flexible and viable in almost every situation, his near-uncontested grouping with his elemental skill and buffing from his Elemental Burst and A2 Passive make him stand out as a top choice.
Even this far into the pool of characters, Sucrose still remains a solid choice for Swirl teams as an Anemo grouper, buffer, and driver.
With the potent Elemental Mastery buffs from her A1 and A2 passive, she enables the team to shred down enemies unfortunate enough to be caught in her Elemental Skill and Burst.
Sucrose Rating and Best Builds
Xianyun (Cloud Retainer) is the premier choice for a plunge-focused team, able to buff the party's plunging damage, as well as being a strong healer.
Her Elemental Skill and Burst enables both her and her team to Swirl elements together with every plunge attack, only further supplemented by her A1 and A2 passive.
Xianyun Rating and Best Builds
Jean functions as both a Sub-DPS, capable of outputting respectable damage on her own, and a potent healer support that can keep the party topped up.
She is a unique choice in the sense that her healing scales off ATK, incentivizing players who build her for damage, and her Elemental Burst self-applying Anemo to the active character.
The Anemo Archon himself takes the spot when it comes to grouping up enemies in one place, able to negate this weakness that is present in some team comps.
With his impressive lockdown capabilities, he indirectly enables Taser and Freeze comps to do more damage because of the frequency of his infused Elemental Burst.
Shikanoin Heizou takes another unique spot as both a Swirl-based DPS and a traditional Anemo DPS, trading the supportive roles of most Anemo Characters for a more damage-focused one.
Rather than directly supporting the team with utility and Elemental Mastery buffs, he opts to personally drive reactions forward and deal damage, shredding them down for his team.
Shikanoin Heizou Rating and Best Builds
| Support (Driver) | Main DPS | Sub-DPS | Support |
|---|---|---|---|
|
|
|
|
|
|
|
|
|
|
Soup teams follow the basic principle of having 3 elements present on the field, along with an Anemo unit to Swirl them all together.
This often leads to an abundance of elemental damage from the plethora of different reactions that occur.
| Main DPS (Driver) | Sub-DPS | Sub-DPS | Support |
|---|---|---|---|
|
|
|
|
|
| Support (Driver) | Main DPS | Sub-DPS | Support |
|
|
|
|
|
Taser teams take the raw damage of Hydro and Electro and introduce Anemo into the mix, adding onto the team's cumulative damage.
With Hydro and Electro being constantly Swirled by the Anemo Unit, this buffs the raw damage from both the Electro and Hydro DPS.
| Support (Driver) | Main DPS | Support | Sub-DPS |
|---|---|---|---|
|
|
|
|
|
|
|
|
|
|
These teams excel at enabling both Vaporize and Reverse Vaporize due to Double Swirling Pyro and Hydro.
In addition to that, most Vaporize teams feature Anemo supports that buff the team's damage via traditional damage buffs, or increasing their Elemental Mastery.
| Support (Driver) | Main DPS | Sub-DPS | Support |
|---|---|---|---|
|
|
|
|
|
|
|
|
|
|
Freeze teams are notorious for their lower overall damage since Freeze is not a damaging reaction. This makes Anemo groupers and buffers particularly important for this comp.
In these scenarios, Anemo units will typically swirl Hydro to keep up the continuous freeze, giving their Main DPS the opportunity to deal uninterrupted damage to the opponent.


Swirl Reaction Guide
Genshin Impact Walkthrough & Guides Wiki

Zenless Zone Zero Walkthrough & Guides Wiki

Honkai: Star Rail Walkthrough & Guides Wiki

Black Myth: Wukong Walkthrough & Guides Wiki

Pokemon Scarlet and Violet (SV) Walkthrough & Guides Wiki

Monster Hunter Rise: Sunbreak Walkthrough & Guides Wiki

Star Wars Outlaws Walkthrough & Guides Wiki

Wuthering Waves Walkthrough & Guides Wiki

Once Human Walkthrough & Guides Wiki

Palworld Walkthrough & Guides Wiki

Elden Ring Shadow of the Erdtree Walkthrough & Guides Wiki

Hyrule Warriors: Age of Calamity Walkthrough & Guides Wiki

The Legend of Zelda: Breath of the Wild Walkthrough & Guides Wiki

Super Smash Bros. Ultimate Walkthrough & Guides Wiki

FF7 Remake Walkthrough & Guides Wiki

Pokemon Legends: Arceus Walkthrough & Guides Wiki

New Pokemon Snap Walkthrough & Guides Wiki
Copyright© 2012-2024 HoYoverse — COGNOSPHERE. All Rights Reserved.
The copyrights of videos of games used in our content and other intellectual property rights belong to the provider of the game.
The contents we provide on this site were created personally by members of the Game8 editorial department.
We refuse the right to reuse or repost content taken without our permission such as data or images to other sites.


