Genshin Impact

Great Hall of Truths Location and Puzzle Guide

Genshin Impact - Great Hall of Truths Puzzle Guide

See how to head to the Great Hall of Truths and complete its puzzles in this guide! The Great Hall of Truths is an underground ruin in Hypostyle Desert, Sumeru for Genshin Impact.

Great Hall of Truths Location

Accessible Through the Dune of Magma

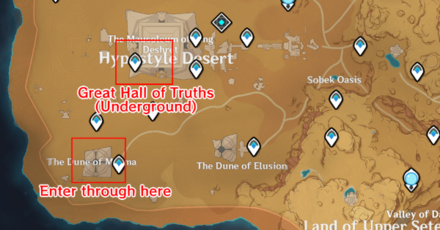
The Great Hall of Truths is located in an underground area, beneath the Hypostyle Desert, that can only be accessed through the Dune of Magma.

Solving the puzzles inside the Dune of Magma and reaching the Great Hall of Truths itself requires enough Clearance in your Scarlet Sand Slate.

The Dune of Magma Puzzle Guide

How to head to the Great Hall of Truths

Duat Hall Location Walkthrough
1
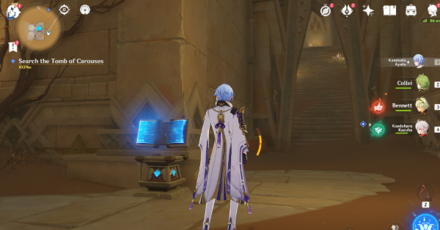
Upon entering Dune of Magma, proceed to the left or right path by interacting the book device. This should open the door. You'll have to use the air current from the Giant Fan Blades if you did go the left path.
2
Carefully time the release of the Primal Ember. The Giant Fan Blades should have just stopped spinning before you release it or else the Ember will break from the wind!
3 Genshin - Dual Evidence - Release the Ember Until it Reaches to the Door
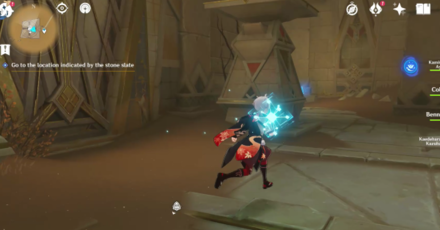
Guide the Primal Ember until it reaches to the main room. The door opens afterwards.
4 Genshin - Dual Evidence - Head inside the door and drop down
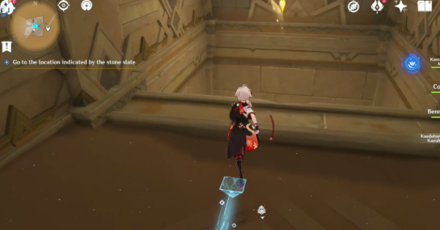
Head inside the door and drop down the hole. You can carry the Forged Primal Lights with you to solve the Remarkable Chest puzzle below!
5 Genshin - Dual Evidence - Drop down to the hole
Past the Remarkable Chest puzzle, drop down to another hole which leads you to an underground cavern.
6 Genshin - Dual Evidence - Proceed deep in the cavern and follow the quest marker
Proceed deep in the cavern while following the quest marker.
7
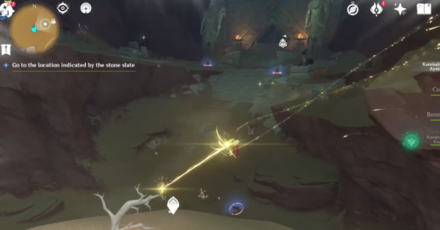
Once you've reached the big area with an inactivated teleport waypoint underneath, you'll find the entrance of Duat Hall on the upper side of slope.
8
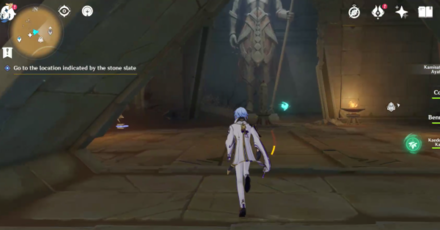
Enter Duat Hall. There should be a seelie on the other side of the room.
9
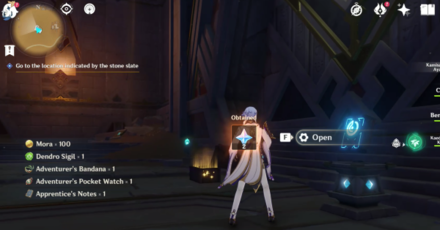
Follow the seelie until it guides you upstairs. There should also be another Teleport Waypoint there. Open the door through the Plinth to reach Duat Hall.
10
Cross the abyss using the Four-Leaf Sigils and enter the next large room to reach the Great Hall of Truths.

Duat Hall Puzzle Guide

Part of Dual Evidence Quest

Genshin - Dual Evidence Quest Guide

The Great Hall of Truths is unlocked by following the Old Notes and New Friends' Dual Evidence world quest. The Great Hall is just next to Duat Hall, or the "Place of Swallowing".

Through this world quest, you will obtain the max clearance (Lv4) that can activate all associated mechanisms across the desert area.

Dual Evidence Puzzles and Quest Guide

Great Hall of Truths Puzzle Guides

Great Hall of Truths Giant Device

After obtaining the fourth clearance during the Dual Evidence quest, you will have to activate the giant device at the center of the Great Hall of Truths to continue.

How to Activate the Giant Device
1
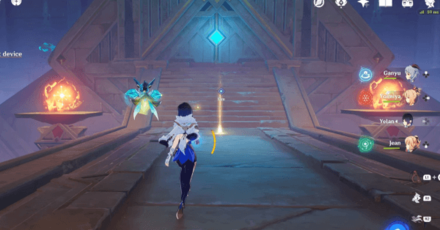
Approach the giant device to unlock the plinths.
2
Operate the plinths on the four corners of the room. These plinths require Lv4 clearance.
3
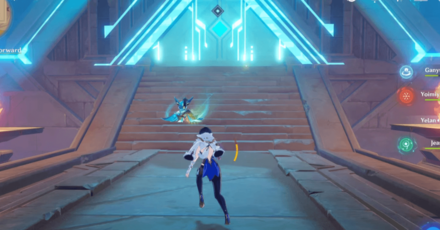
After activating, return to the giant device and pass through it to continue the quest.
4
You will arrive at the hidden compartment of the mausoleum (the inverted pyramid) after passing through the gate. Release the Primal Embers from the small torches on the other three sides of the room.
5
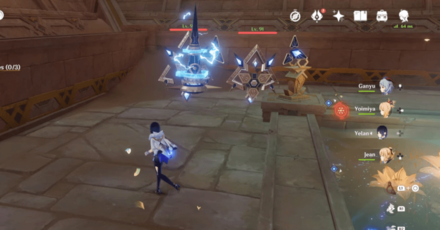
Two Primal Constructs will appear each time an ember reaches another small Primal Torch. Guide the embers towards the large Primal Torches at the center to reach the top of the mausoleum and progress the quest.

Great Hall of Truths Precious Chest

Behind the giant device in the main hall area is a Precious Chest that is locked by two large Primal Torches.

How to Unlock the Precious Chest
1
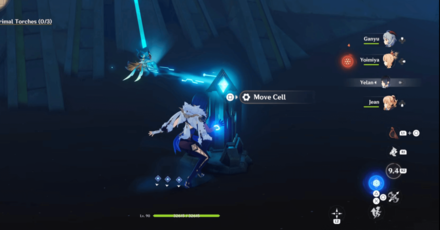
Drop down the ledge in front of the Precious Chest to find a Primal Cell. Interact with the cell and follow it to the west side of the giant device, where it will spawn a Primal Ember.
2
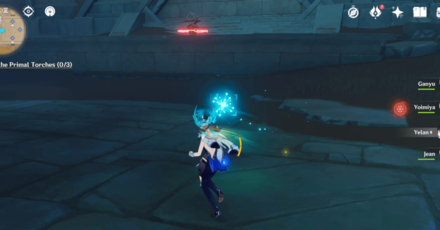
Follow the Primal Ember to the upper level where it will move to a small Primal Torch. Release the ember and guide it to the large Primal Torch beside the Precious Chest.
3
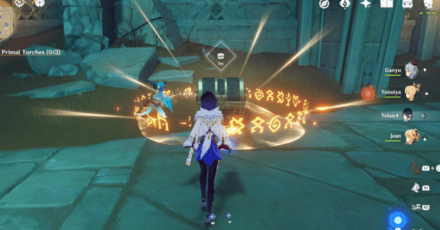
Go back to the moving Primal Cell and transfer it to the other side of the room where it will spawn a second Primal Ember. Guide the ember to the upper level and to the large Primal Torch to unlock the Precious Chest!

Genshin Impact Related Guides

All Tips and Tricks Guides

Genshin Impact - Tips and Tricks

All Tips & Tricks Guides

All Version 3.1 Tips & Tricks

Other Tips & Tricks
Replicator Keystones and How to Create Ruin Devices Invisible Wall Puzzle Guide in Sumeru Forged Primal Lights Puzzles and How to Use
Sekhem Hall Puzzles and Treasure Guide Desert Mirage Puzzles Guide in Sumeru Aaru's Shut Puzzle Guide and Sacred Seal Locations
Abdju Road Puzzles and Treasures Guide Primal Obelisk Locations and Puzzle Guide in Sumeru Clearance Guide to Get More Special Levels
Great Hall of Truths Location and Puzzle Guide How to Unlock and Use Obscuring Cells Desert Illusory Murals Guide in Sumeru
Everlight Cell and Beam Transmission Puzzles in Sumeru Khemenu Temple Puzzle Guide "You do not have enough clearance" Guide
How to Try to Open the Coffin in Mausoleum of King Deshret How to Enter Thutmose's Secret Base in Lamb-Devourer Rock Follow the Stone Slate's Guidance and Obtain Full Clearance

Other Regional Tips & Tricks

Other Tips & Tricks
Huitztli Hill Puzzle Guide and Luxurious Chests Warrior Challenge Locations How to Unlock Natlan Reputation
How to Use Coilgrass Sigils How to Use Flamegranates How to Use Relay Balls
How to Use Grappling Hooks How to Use Spiritways How to Unlock Firethief's Secret Isle Luxurious Chest
How to Get The Cornerstone of Stars and Flames Strange Saurian Cart Key Location and How to Use How to Get Blazing Flint Ore
All Four Iridescent Inscription Locations and How to Use Wooden Model Alpaca Locations and How to Use Broken, Graffiti-Marked Stone Locations
Phlogiston Extraction Research Center Puzzle Guide Night Jade Location and How to Use Key to Somewhere Location and How to Use
Green Obsidian Ring Location and How to Use Azure Obsidian Ring Location and How to Use Obsidian Fragment and Ring Locations
Yellow Obsidian Ring Location and How to Use Nightsoul's Blessing and Burst Mechanic Guide Phlogiston of Natlan Guide
All 8 Eremite Camp Locations in Sumeru Floral Throne Location and Puzzle Guide Wounded Shin Valley Luxurious Chest and Other Puzzles Guide
Gurabad's Ruin - Temple of Deshret Puzzles Guide All Wadi Al-Majuj Sacred Seals in Sumeru Desert 3.4 Dual-Phase Neverlight Cells in Hadramaveth Desert
How to Upgrade the Power of Jinni in the Magic Bottle Runic Window and Runic Pane Switch Puzzle Guide How to Break Weathered Rocks in the Desert
How to Get Rid of Small and Large Atmospheric Vortexes Passage of Ghouls Luxurious Chest and Pyro Totem Puzzle Guide Safhe Shatranj Sand Puzzle and Luxurious Chest Guide
How to Get the Final Clearance in Desert of Hadramaveth How to Solve Cascade Pools and Spouts Puzzle Guide How to Use Jinn Shrines Guide
Manifestation Mechanisms and Signal Spirits Puzzle Guide Primal Sandglass Puzzle Guide in Sumeru Weathered Obelisk Puzzle Solutions and Locations
Memories of the Eternal Oasis Location and Puzzle Guide How to Disperse the Purple Mist in Asipattravana Swamp Hadramaveth Remarkable Chest Locations and How to Get
Nirodha Fruit Locations and Puzzle Guide Khvarena Mayfly Locations and Puzzle Guide Asipattravana Swamp Luxurious Chest Puzzle
Ruebright Blooms Puzzle Guide All Time Trials in Gavireh Lajavard and Realm of Farakhkert Burgeoning Spirit Puzzle Guide
How to Destroy Gray Crystals with Khvarena How to Jump Over the Corresponding Floating Mushrooms All Elemental Totems in Gavireh Lajavard and Realm of Farakhkert
All Torch Puzzle Solutions in 3.6 Girdle of the Sands All Plume of Purifying Light Locations Possible Door to Khaenri'ah Location in Gavireh Lajavard
Amrita Mayflies Puzzle Guide Sunyata Flower Locations and Puzzle Guide Bright Flame Altar Puzzle Guide
How to Use the Power of Khvarena Passage of the Ghouls Torch Puzzle Guide All 76 Aranara Locations in Sumeru and Puzzle Guide
Vanarana Luxurious Chest Puzzle and 3 Seelies Locations Strange Energy Extraction Device Puzzles and Key Locations Guide Broken Monuments in Sumeru Locations and Puzzle Guide
Strange Parchment Locations and Puzzle Guide Unsealed Parchment Locations and Puzzle Guide Guiding Parchment Locations and Puzzle Guide
Whispering Parchment Locations and Puzzle Guide Sumeru Arrow Rune Puzzle Locations and Guide Scylla Details and How to Summon Currents
Fontaine Viewpoints and Location What is the Might of the Ancient Symphony? Washer Octopus Puzzle Guide
Lost Grimoire Locations and Bookshelf Puzzle Guide The Flying Outlander Achievement Guide How to Pet Osse
Wonderchime Flowers and Allochromatic Anemones Puzzle Guide All Ancient Autoharmonic Music Box Score Locations Lacrimosa Score Location and How to Use
Confutatis Score Location and How to Use Dies Irae Location and How to Use Rex Tremendae Location and How to Use
Tuba Mirum Location and How to Use Locus Amoenus Score Location and How to Use Auric Anglerfish Locations and Puzzle Guide
Chizhang Wall Puzzle and How to Solve What are Allogravity-Condensed Water Bodies? How to Destroy Red Meanies
Fixed Storage and Energy Transfer Device How to Destroy the Thorny Cyst How to Stop the Strange Eels
Pneumousia Relay Guide Pneumousia Storage Box Guide Fantastical Floating Ball Guide
Sonar Resonance Points Guide High-Pressure Water Vent Guide How to Solve Fontaine Echoing Conches
Water Volume Detection Crystal Puzzle Guide Locked Underwater Dome in Fontaine Puzzle Guide How to Destroy Bullet Barnacles
Transoceanic Sourcewater Guide Knocking Vases Locations in Chenyu Vale Cube Device Puzzle Guide | Inazuma Cube Pattern Puzzle
Aranyaka Mysterious Clipboard Locations and Aranara Painting Guide How to Collect the Carp Spirit Orb How to Get the Secret Miracle Achievement
Strange Phenomenon: Miasma Puzzle Guide How to Solve Millennia of History Puzzles Scenes of Flowing Lotuses Puzzle Guide
How to Get the Adeptus's Repose Luxurious Chest How to Find the Secret Stashed in the Arcane Archive All Ancient Swordsman's Inscription Locations
Xuanji Chest and How to Open Jade Incense Cauldron Locations and Puzzle Guide Golden Carp's Leap Puzzle Guide
Sacred Simulacrum Types and Puzzles Guide Stone Pillar Seal Puzzle Locations and Guide Where to Get the Ancient Stone Key
Mysterious Clipboard 1 Location and Aranara Painting Mysterious Clipboard 13 Location and Aranara Painting Mysterious Clipboard 12 Location and Aranara Painting
Mysterious Clipboard 9 Location and Aranara Painting Mysterious Clipboard 10 Location and Aranara Painting Mysterious Clipboard 3 Location and Aranara Painting
Mysterious Clipboard 2 Location and Aranara Painting Mysterious Clipboard 4 Location and Aranara Painting Mysterious Clipboard 5 Location and Aranara Painting
Mysterious Clipboard 6 Location and Aranara Painting Mysterious Clipboard 8 Location and Aranara Painting Mysterious Clipboard 7 Location and Aranara Painting
Mysterious Clipboard 11 Location and Aranara Painting How to Solve Pipe Diverter Valve Puzzles in the Sumeru Desert 3.4 All Chess Piece Locations and How to Use
Safhe Shatranj Chess Puzzle Guide Lightcall Path Puzzle Guide Cipher Letter Puzzle and Locations
Not So Strait is the Gate in Bravais' Hidden Study How to Retrieve All 4 Replica Anchors Remains of the Day Secret Achievement and Chest Guide
Look For A Fravashi Tree Locations and Puzzle Guide How to Play Kory Drums and Locations How to Search for Nurseries in the Wild and All Locations in the Forest
How to Solve Floating Crystal Flowers and Platforms Potential Energy Orbs How to Solve and Locations Humongous Hat Jellyfish How to Solve and Locations
How to Solve Harmonious Reed Pipes and Locations How to Solve Dew Bubbles and Branches How to Remove Contaminated Bacterial Mats
Water Barrier Seelie Luxurious Chest How to Use Energy Transfer Terminals How to Go to the Abandoned Production Zone
Gear Drivetrain and Drive Valve Puzzle How to Solve the Forging Press Puzzle Flying Energy Thief Guide
How to Operate the Drive Valve to Open Access to Supply Warehouse 1 Stabilizer Puzzle Guide How to Avoid the Searchlight's Detection Range
How to Get to Narzissenkreuz Ordo Opera Epiclese Heart Plant Co-Op Chest Underwater Combat and Exploration Guide
Mysterious Parchment Locations and Puzzle Guide How to Get and Use the Twin-Horned Chaplet How to Get the Lumenspar Behind the Chasm Locked Gate
Vourukasha Oasis Heart Pool Co-Op Chest How To Find The Great Songs of Khvarena Guide How to Use Scarlet Quartz and Break Ancient Rime
How to Go Through the Passage and Reach the Balladeer | Deus Foundry Domain and Chest Guide How to Collect Sumeru Rose Seeds Drusus's Riddle and Sumeru Bulletin Board Puzzle Guide
How to Go to the Fane of Ashvattha Location and Lower the Water Level How to Proceed to the Location Shown in the Painting in Static Views How to Look for the Head Mushroom
Where to Find Xinyue Kiosk's Location in Liyue Harbor How to Purify the Large Crystal in The Chasm How to Ring the Two Bells on Either Side of the Ruins
Nameless Treasure Locations, Rewards, and Where to Sell How to Follow the Water's Flow and Search for the Source in The Chasm How to Look for the Ring Stolen from Taliesin
How to Avoid Balethunder Damage | Balethunder Guide Electric Lamp Puzzle Guide How to Get to Heart Island | Secret Island Location and Rewards
Dandy's Time Trial Challenge | Locations and Rewards

    Walkthrough Menu

    All rights reserved